Si prefiere, nuestro traductor, y solicitarle que lo realice antes.
Posiblemente necesite
- Destornillador aislado
- Multímetro
The high-tension (HT) circuit
Make sure that all the wiring connections are sound. Always take great care when working with the ignition circuit, to avoid electric shocks. Use tools with well insulated handles.
The high-tension (HT) or secondary circuit carries high-voltage electricity. It runs from the secondary winding of the coil through the distributor to the plugs. Any of these can break down and cause ignition failure.
Do not touch any part of the HT circuit with bare hands when the ignition is switched on. Work with pliers and screwdrivers that have thickly insulated plastic handles. Take care not to touch any metal parts of the tools.
Since HT-circuit checks involve using the car's own HT leads, begin by testing the leads to make sure that they are sound.
Testing the coil secondary winding
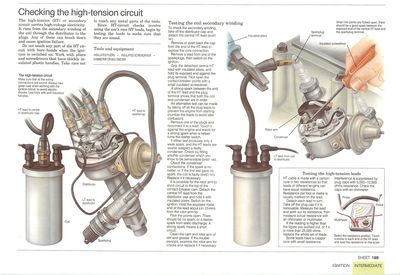
When points are flicked open there should be a good spark between the exposed end of the central HT lead and the sparkplug terminal.
To check the secondary winding, take off the distributor cap and detach the central HT lead (See Inspecting the ignition system).
Remove or push back the cap from the end of the HT lead to expose the core connection.
Remove a lead from one of the sparkplugs, then switch on the ignition.
Grip the detached central HT lead with insulated pliers, and hold its exposed end against the plug terminal. Flick open the contact-breaker points with a small insulated screwdriver.
A strong spark between the end of the HT lead and the plug terminal shows that both the coil and condenser are in order.
An alternative test can be made by taking off all the plug leads to prevent the engine from starting (number the leads to avoid later confusion).
Remove one of the plugs and reconnect it to a lead. Touch it against the engine and watch for a strong spark when a helper turns the starter switch.
If either test produces only a weak spark, and the HT leads are sound, suspect a faulty condenser. Check by fitting another condenser which you know to be serviceable (See Fitting a condenser).
Check the condenser connections. If the spark is no better, or if the first test gave no spark, the coil is faulty (See Inspecting the ignition system). Replace it if necessary.
It is possible for the rotor arm to short circuit to the top of the contact-breaker cam. Detach the central HT lead from the distributor cap and hold it with insulated pliers. Switch on the ignition. Hold the exposed metal end of the lead about in. (3mm) from the rotor-arm tip.
Flick the points open. There should be no spark, or a feeble spark from static discharge. A strong spark means a short circuit.
Clean the cam and rotor arm of dirt and grease. If the trouble persists, examine the rotor arm for cracks and replace it if necessary.


