
Si prefiere, nuestro traductor, y solicitarle que lo realice antes.
Posiblemente necesite
- Llaves
- Enchufes
- Destornilladores
- Punzón
- Alicates universales
- Aceite de motor
- Trapo
- Torque Wrench
Leyland O series
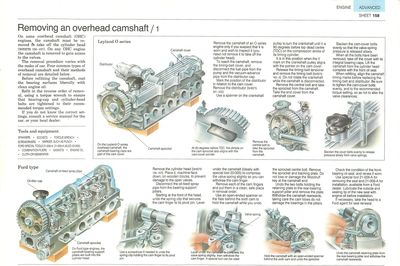
On the leyland O series overhead camshaft, The camshaft bearing caps are part of the cam cover.
On some overhead camshaft (OHC) engines. the camshaft must be removed to take off the cylinder head (See How to remove a cylinder head). On any OHC engine the camshaft is removed to gain access to the valves.
The removal procedure varies with the make of car. Four common types of overhead camshaft and their methods of removal are detailed below.
Before refitting the camshaft, coat the bearing surfaces liberally with clean engine oil.
Refit in the reverse order of removal, using a torque wrench to ensure that bearing-cap and cylinder-head bolts are tightened to their recommended torque settings.
If you do not know the correct settings, consult a service manual for the car, or your local dealer.
Leyland O series
Leyland O series
On the leyland O series overhead camshaft, The camshaft bearing caps are part of the cam cover.
Remove the camshaft of an O series engine only if you suspect that it is worn and wish to inspect it (you need not remove it to take off the cylinder head)
To reach the camshaft, remove the timing-belt cover, and disconnect the fuel pipe from the pump and the vacuum-advance pipe from the distributor cap.
Mark the position of the distributor in relation to the cam cover. Remove the distributor.
Use a spanner on the crankshaft pulley to turn the crankshaft until it is 90 degrees before top dead centre on the compressor stroke of its timing cylinder.
it is in this position when the V mark on the crankshaft pulley aligns with the pointer on the cam cover.
At 90 degrees before TDC, the dimple on the cam sprocket also aligns with the cam-cover pointer.
Release the timing-belt tensioner and remove the timing belt. Do not rotate the crankshaft while the camshaft is disconnected.
Remove the central bolt and take the sprocket from the camshaft. Take the end cover from the crankshaft cover.
Remove the central bolt to take the sprocket from the camshaft.
Slacken the cam-cover bolts evenly so that the valve-spring pressure is released slowly.
When all the bolts have been removed, take off the cover with its integral bearing caps. Lift the camshaft from the cylinder head complete with the front oil seal.
Slacken the cover bolts evenly to release pressure slowly from the valve springs.
When refitting, align the camshaft timing marks before replacing the timing belt and distributor. Be sure to tighten the cam-cover bolts evenly, and to the recommended torque setting, so as not to alter the valve clearances.
Ford type
Ford type
On Ford type engines, the camshaft bearing support pillars are built into the cylinder head.
Remove the cylinder head. Place it, machine faced down, on wooden blocks, to prevent damage to the open valves.
Disconnect the oil-feed spray pipe from the bearing support pillars.
Starting at the front of the head, undo the spring clip that secures the cam finger to its pivot pin. Lever under the camshaft to compresses the valve spring so you can withdraw the cam finger.
Use a screwdriver if needed to undo the spring clip holding the cam finger to its pivot pin.
Remove each of the cam fingers and put them in a clean, safe place in removal order.
Use an open-ended spanner on the flats behind the sixth cam to hold the camshaft while you undo the sprocket centre bolt. Remove the sprocket and backing plate. Do not loose or damage the Woodruff key at the camshaft end.
Lever under the camshaft to compress the valve spring slightly, then withdraw the cam finger. A special tool can be used.
Undo the two bolts holding the retaining plate to the rear-bearing support pillar and remove the plate. Withdraw the camshaft rearwards, taking care the cam lobes do not damage the bearing in the pillars.
Check the condition of the front-bearing oil seal, and renew if worn.
Hold the camshaft with an open-ended spanner behind the sixth cam and undo the sprocket.
Use special tool 21-008-A for removing the seal and 21-009-A for installation, available from a ford dealer. Lubricate the outside and sealing lip of the new seal with engine oil before installation.
If necessary, take the head to a Ford agent for seal renewal.
On Ford type engines, the camshaft bearing support pillars are built into the cylinder head.
Undo the camshaft retaining plate from the rear-bearing pillar and withdraw the camshaft rearwards.
Ue a screwdriver if needed to undo the spring clip holding the cam finger to its pivot pin.
Lever under the camshaft to compress the valve spring slightly, then withdraw the cam finger. A special tool can be used.
Hold the camshaft with an open-ended spanner behind the sixth cam and undo the sprocket.
Undo the camshaft retaining plate from the rear-bearing pillar and withdraw the camshaft rearwards.
Vauxhall and VW types
Vauxhall and VW types
On vauxhall and VW overhead-camshaft types, the camshaft is mounted on a separate carrier above the cylinder head.
The camshaft carrier assembly is removed to gain access to the cylinder-head bolts.
Use a spanner on the crankshaft pulley nut to turn the crankshaft until the piston in No. 1 cylinder is at top dead centre (TDC), indicated when the timing marks are correctly aligned (See Adjusting the static timing)
Using a socket spanner, undo the cam carrier bolts evenly to avoid distortion.
Remove the camshaft drive-belt cover and disconnect the belt from the sprocket (See Adjusting a camshaft timing belt). Do not turn the sprocket, or the valves may contact the pistons and be damaged.
Remove the carrier cover and undo the carrier securing bolts evenly and in turn to avoid any distortion.
Lift off the carrier, and immediately it clears the springs turn it on its side.
Carefully lift the carrier off the cylinder head. As soon as the tappets are clear of the valve springs, turn the carrier on its side so that the tappets do not drop out of their bores.
Undo the cam-sprocket centre bolt and remove the sprocket. Take out the tappets and place them in the order in which you removed them, so that you can refit them in the same positions.
Undo the centre bolt and take the sprocket off the camshaft.
Take off the end cover from the carrier and undo the thrust-plate retaining bolt. Carefully withdraw the camshaft rearwards, making sure the cam lobes do not damage the cam bearers in the support pillars.
Check the condition of the front-bearing oil seal, and fit a new one if it is worn or leaking. Prise out the old seal with a screwdriver.
Remove the end cover and thrust plate, then withdraw the camshaft.
Oil the lip of the new seal and drive it in open side first until it abuts with the housing.
When refitting the carrier, renew any gaskets. Align the sprocket timing marks before replacing the drive belt.
Leyland Dolomite 1850 type
Leyland Dolmoite 1850 camshaft
A leyland Dolomite 1850 type camshaft is secured by removable bearing caps bolted to the cylinder head.
The camshaft must be removed to adjust the tappet shims, or to take off the cylinder head (See How to remove a cylinder head).
Remove the camshaft cover and gasket, and the rubber grommet in front of the camshaft drive sprocket. Use a spanner to turn the crankshaft until the timing mark on the camshaft sprocket flange is at the bottom.
Secure the sprocket spigot bolt to the support stay with a suitable nut.
Pack newspaper or clean, lint-free cloth into the space between the camshaft sprockets and the cylinder head so that nothing can fall in.
Find a nut to fit the sprocket spigot bolt and secure the bolt to the support stay (a bearing-cap nut usually fits). This will hold the sprocket and timing chain in position after the camshaft has been released.
Pack newspaper between the sprocket and cylinder head before removing a sprocket securing bolt.
Remove one of the two bolts that secure the sprocket to the camshaft. Take out the packing and turn the crankshaft clockwise (from the front), until the timing mark on the camshaft sprocket flange aligns with the mark on the front bearing cap. Replace the packing and remove the remaining sprocket bolt.
Turn the crankshaft further clockwise until the timing mark is aligned at TDC. This will ensure the valves do not hit the pistons when refitting.
Align the camshaft timing marks before removing the second sprocket bolt.
Slacken the nuts on the camshaft bearing caps evenly and a little at a time to release the valve-spring pressure slowly. Lift off each bearing cap and put it in removal order in a safe place.
Undo the bearing-cap nuts evenly and a little at a time t release pressure slowly.
Carefully lift off the camshaft from the cylinder head.
When refitting, align the camshaft timing marks before fitting the first sprocket bolt.


